Gradle
简介
smart-doc-gradle-plugin是smart-doc官方团队开发的gradle插件,该插件从smart-doc 1.8.6版本开始提供, 使用smart-doc-gradle-plugin更方便用户集成到自己的项目中,集成也更加轻量,你不再需要在项目中编写单元测试来 启动smart-doc扫描代码分析生成接口文档。可以直接运行gradle命令 或者是IDEA中点击smart-doc-gradle-plugin预设好的task即可生成接口文档。
快速开始
添加插件
Gradle中添加插件有两种方式: 一种是DSL,高版本Gradle推荐直接使用DSL,另一种是legacy。
使用 plugins DSL
plugins {
  id "com.github.shalousun" version "[最新版本]"
}
使用旧版插件应用程序
buildscript {
    repositories {
        maven {
            url 'https://maven.aliyun.com/repository/public'
        }
        maven {
            url 'https://maven.aliyun.com/repository/gradle-plugin'
        }
        maven {
            url = uri("https://plugins.gradle.org/m2/")
        }
        mavenCentral()
    }
    dependencies {
        classpath 'com.github.shalousun:smart-doc-gradle-plugin:[最新版本]'
    }
}
apply(plugin = "com.github.shalousun")buildscript配置添加到build.gradle的顶部 。
插件 options
使用smart-doc插件还需要在build.gradle添加一些常见本身的配置
| Option | Default value | Required | Description |
|---|---|---|---|
| configFile | src/main/resources/default.json | true | 插件配置文件 |
| exclude | 无 | false | 排除一些无法自动下载的java lib sources,例如:exclude 'org.springframework.boot:spring-boot-starter-tomcat' |
| include | 无 | false | 让插件自定下载指定的java lib sources,例如:include 'org.springframework.boot:spring-boot-starter-tomcat' |
options配置示例:
smartdoc {
    configFile = file("src/main/resources/smart-doc.json")

    // exclude example
    // exclude artifact
    exclude 'org.springframework.boot:spring-boot-starter-tomcat'
    // exclude artifact use pattern
    exclude 'org.springframework.boot.*'
    // 你可以使用include配置来让插件自动加载指定依赖的source.
    include 'org.springframework.boot:spring-boot-starter-tomcat'
}对于configFile的配置,你也可以通过gradle命令行来动态覆盖。在3.0.3之前, 可以在build.gradle中添加动态获取configFile的配置, 例如:
smartdoc {
    configFile = project.hasProperty('smartdoc.configFile') ? file(project.getProperty('smartdoc.configFile')) : file("src/main/resources/smart-doc.json")
}
配置好后直接通过命令行覆盖:
gradle smartdoc -Psmartdoc.configFile=src/main/resources/smart-doc.json从3.0.3版本开始,命令行动态配置configFile很简单,插件完全具备覆盖build.gradle中configFile配置项的能力。
smartdoc {
    configFile =  file("src/main/resources/smart-doc.json")
}配置后直接使用-Psmartdoc.configFile即可覆盖
对于多模块的gradle,把smart-doc插件相关配置放到根目录build.gradle的subprojects中。
subprojects{
    apply plugin: 'com.github.shalousun'
    smartdoc {
        //
        configFile = file("src/main/resources/smart-doc.json")
        // exclude artifact
        exclude 'org.springframework.boot:xx'
        exclude 'org.springframework.boot:ddd'
        // 你可以使用include配置来让插件自动加载指定依赖的source.
        include 'org.springframework.boot:spring-boot-starter-tomcat'
    }
}多模块smart-doc的实战demo参考
https://gitee.com/smart-doc-team/smart-doc-gradle-plugin-demo多模块和单模块项目是有区别,多模块不从根目录使用命令构建可能会导致模块间源代码加载失败,生成文档出现各种问题。
configFile
在自己的项目中创建一个json配置文件,如果是多个模块则放到需要生成文档的模块中,smart-doc-gradle-plugin插件会根据这个配置生成项目的接口文档。 例如在项目中创建/src/main/resources/smart-doc.json。配置内容参考如下。
最小配置单元:
{
   "outPath": "D://md2" //指定文档的输出路径 相对路径时请写 ./ 不要写 / eg:./src/main/resources/static/doc
}
运行插件生成文档
使用 Gradle 命令
//生成文档到html中
gradle smartDocRestHtml
//生成markdown
gradle smartDocRestMarkdown
//生成adoc
gradle smartDocRestAdoc
//生成postmanjson数据
gradle smartDocPostman
//生成Open Api 3.0 +规范的json文档,since smart-doc-gradle-plugin 1.1.4
gradle smartDocOpenApi
//生成rest接口文档并推送到Torna平台,@since 2.0.9
gradle tornaRest
//生成Jmeter性能压测脚本,since 3.0.0
gradle smartDocJmeter
//生成文档输出到Word,since 3.0.0
gradle word


// Apache Dubbo Rpc生成
// Generate html
gradle smartDocRpcHtml
// Generate markdown
gradle smartDocRpcMarkdown
// Generate adoc
gradle smartDocRpcAdoc
// 推送rpc接口到torna中
gradle tornaRpc

// 标注 `@javadoc` 的普通接口或者静态工具类生成文档, 3.0.5版本开始支持
// Generate html
gradle javadocHtml
// Generate markdown
gradle javadocMarkdown
// Generate adoc
gradle javadocAdoc
使用 IDEA
当你使用Idea时,可以通过Gradle Helper插件选择生成何种文档。

插件源码
插件调试
smart-doc-gradle-plugin插件依赖于smart-doc来完成文件的解析,smart-doc-gradle-plugin主要是为了用户更加快速简易的 将smart-doc集成到项目 中生成API文档,同时smart-doc-gradle-plugin插件也是给smart-doc进行赋能,实现自动分析一些source jar的源码的路径, 然后将路径赋予smart-doc方便更好的基于源码分析。
但是smart-doc面对着很多的用户,各式各样的代码我们在开发的时候并不能完全考虑到。有的代码甚至作者也从未写过。 因此出现一些不明原因时通常需要用户自己进行调试。本节将介绍如何在自己的项目中通过smart-doc-gradle-plugin来调试smart-doc底层的解析。
添加smart-doc依赖
添加smart-doc依赖主要是方便直接查看到源码调试。未发生错误,不需要调试事并不需要在自己的项目中添加smart-doc依赖。
dependencies {
    testCompile 'com.github.shalousun:smart-doc:【最新版本】'
}找到smart-doc源码打上断点。操作如下图: 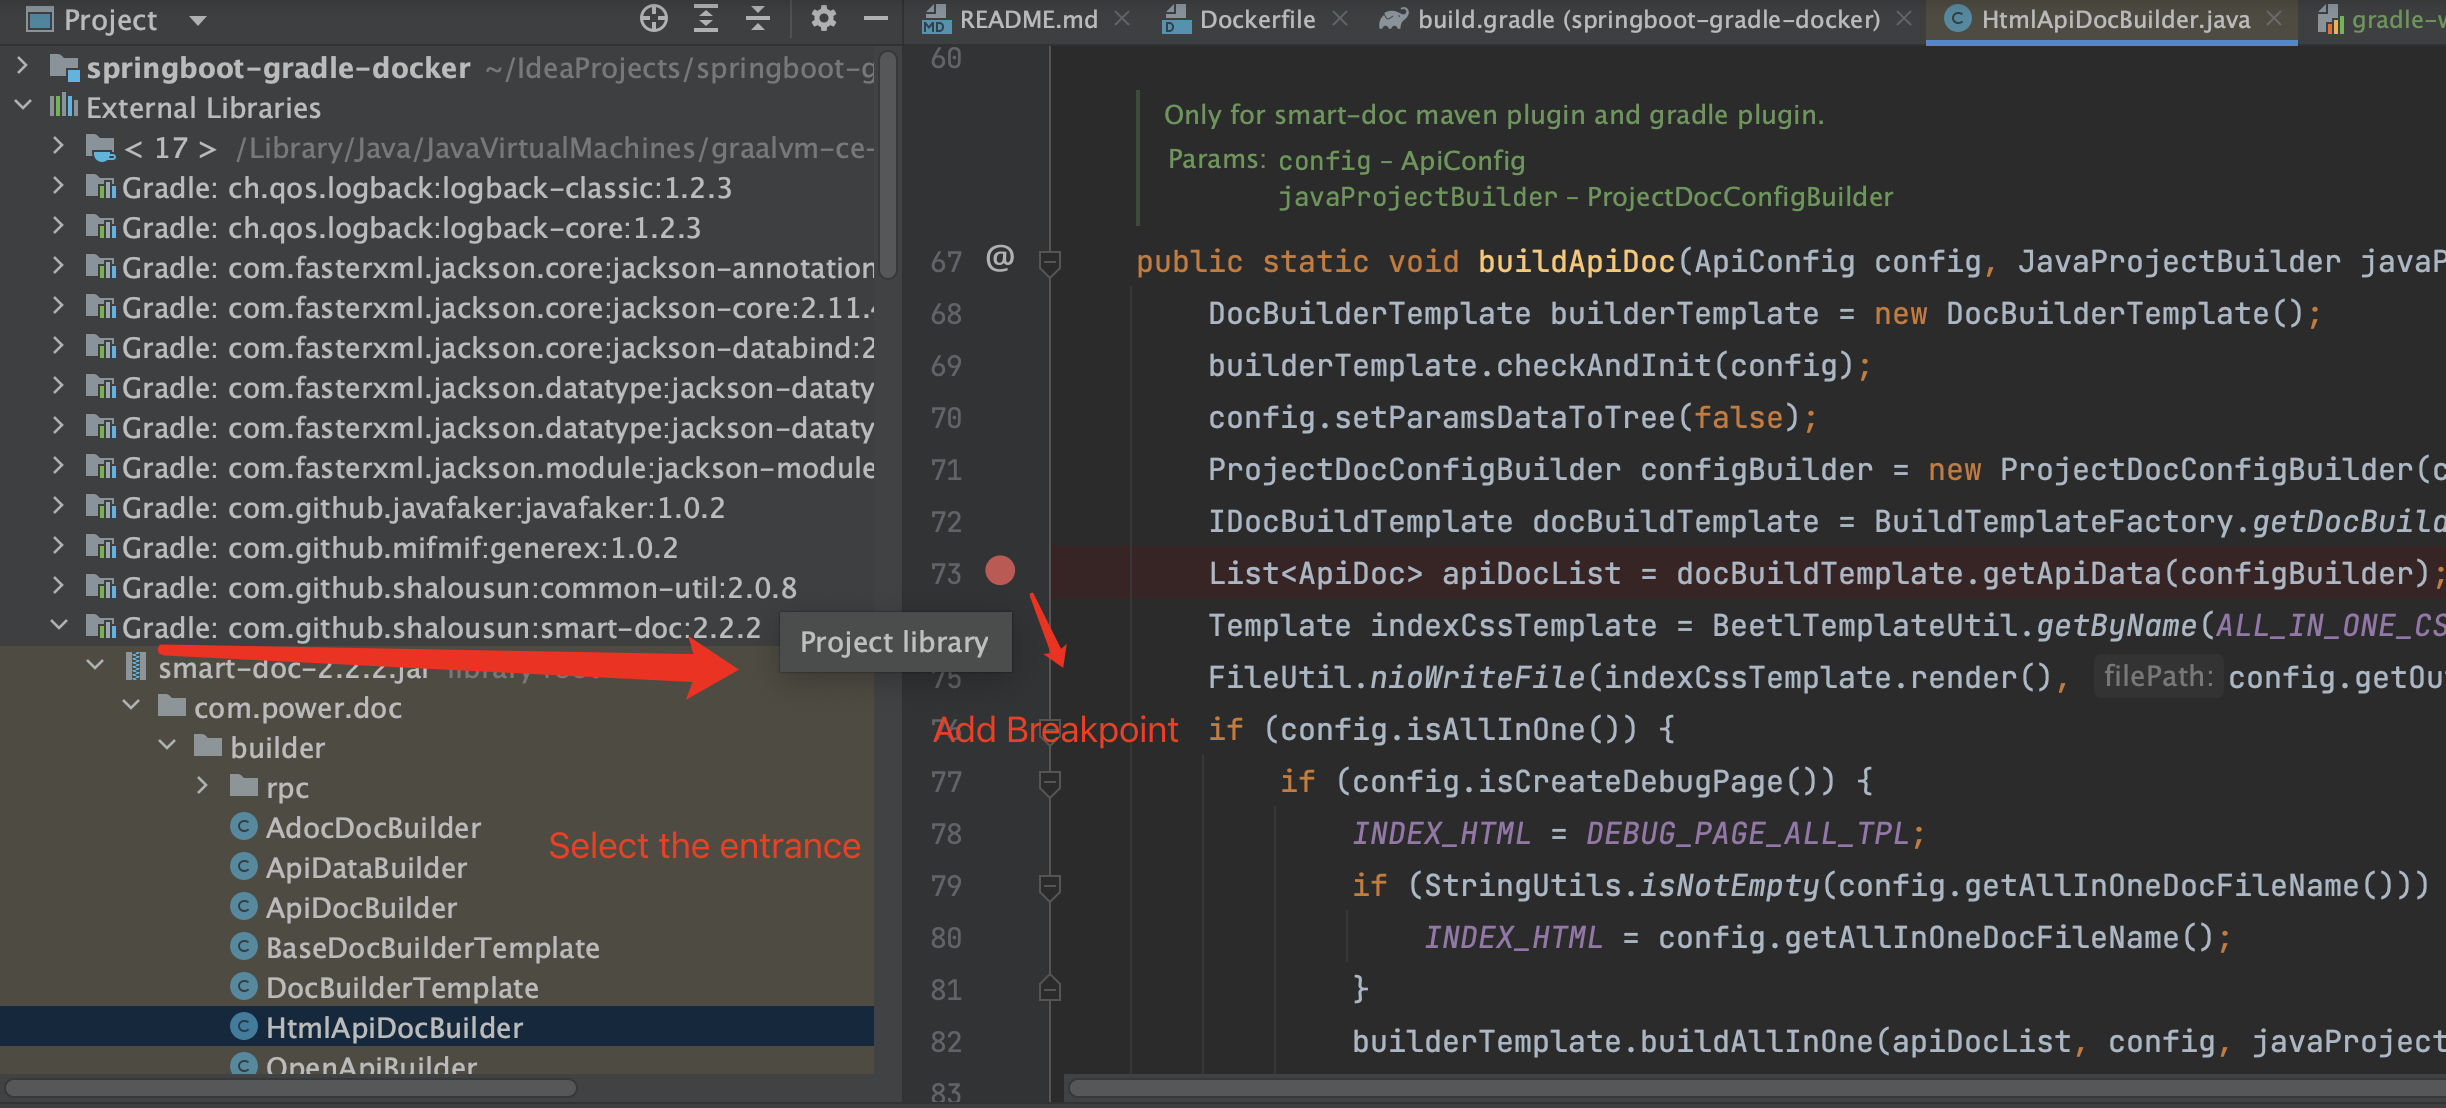 "debug1.png")
命令行终端设置debug模式
Gradle插件的调试并不像调试JAVA程序和Maven插件那么简单。在IDEA上直接点击debug启动相关操作就可以直接调试了。 需要实现在命令行设置调试模式。操作如下图:  图中主要是打开命令行终端指定让
smart-doc-gradle-plugin的某一个task使用debug模式运行, 如上图所示指定构建html文档的task来开启debug模式,命令示例如下:
gradlew smartDocRestHtml -Dorg.gradle.daemon=false -Dorg.gradle.debug=true如果执行上面命令出现下面的错误
错误: 找不到或无法加载主类 org.gradle.wrapper.GradleWrapperMain则请先执行下面一条命令让Gradle自动下载设置好GradleWrapper,当然网络问题自行处理。
gradle wrapper添加一个远程调试监听
点击 Edit Configurations 点开左边的"+"号,点击"Remote"
执行调试
完成上面的操作后即可用debug调试进入插件和smart-doc了,然后查看smart-doc的执行情况。操作如下图 