Gradle
Introduce
smart-doc-gradle-plugin is a gradle plugin developed by the smart-doc official team. This plugin is available starting from smart-doc 1.8.6 version. Using smart-doc-gradle-plugin is more convenient for users to integrate into their own projects, and the integration is also more lightweight. You no longer need to write unit tests in the project. Start smart-doc to scan code analysis and generate interface documentation. You can run the gradle command directly Or click on the preset task of smart-doc-gradle-plugin in IDEA to generate the interface document.
Getting started
Add plugin
There are two ways to add plug-ins in Gradle: one is DSL. It is recommended to use DSL directly for higher versions of Gradle, and the other is legacy.
Using the plugins DSL
Using the plugins DSL:
plugins {
  id "com.github.shalousun" version "[latest]"
}
Using legacy plugin application
Using legacy plugin application:
buildscript {
    repositories {
        maven {
            url 'https://maven.aliyun.com/repository/public'
        }
        maven {
            url 'https://maven.aliyun.com/repository/gradle-plugin'
        }
        maven {
            url = uri("https://plugins.gradle.org/m2/")
        }
        mavenCentral()
    }
    dependencies {
        classpath 'com.github.shalousun:smart-doc-gradle-plugin:[latest]'
    }
}
apply(plugin = "com.github.shalousun")
buildscript configuration added to the top of build.gradle.
Plugin options
Using the smart-doc plug-in also requires adding some common configurations to build.gradle
| Option | Default value | Required | Description |
|---|---|---|---|
| configFile | src/main/resources/default.json | true | Plug-in configuration file |
| exclude | None | false | Exclude some java lib sources that cannot be downloaded automatically, for example: exclude 'org.springframework.boot:spring-boot-starter-tomcat' |
| include | None | false | Let the plug-in download the specified java lib sources, for example: include 'org.springframework.boot:spring-boot-starter-tomcat' |
Example setting of options:
smartdoc {
    configFile = file("src/main/resources/smart-doc.json")

    // exclude example
    // exclude artifact
    exclude 'org.springframework.boot:spring-boot-starter-tomcat'
    // exclude artifact use pattern
    exclude 'org.springframework.boot.*'
    // You can use the include configuration to let the plug-in automatically load the source of the specified dependency.
    include 'org.springframework.boot:spring-boot-starter-tomcat'
}
For the configuration of configFile, you can also dynamically override it through the gradle command line. Before version 3.0.3, you can add dynamic configuration to get the configFile in build.gradle, for example:
smartdoc {
    configFile = project.hasProperty('smartdoc.configFile') ? file(project.getProperty('smartdoc.configFile')) : file("src/main/resources/smart-doc.json")
}
After configuring, you can directly override it through the command line:
gradle smartdoc -Psmartdoc.configFile=src/main/resources/smart-doc.jsonFrom version 3.0.3, dynamic configuration of the configFile via the command line is very simple, as the plugin is fully capable of overriding the configFile configuration item in build.gradle.
smartdoc {
    configFile =  file("src/main/resources/smart-doc.json")
}
After configuration, you can directly use -Psmartdoc.configFile to override it.
For multi-module gradle, put the smart-doc plug-in related configuration into subprojects in the root directory build.gradle.
subprojects{
    apply plugin: 'com.github.shalousun'
    smartdoc {
        //
        configFile = file("src/main/resources/smart-doc.json")
        // exclude artifact
        exclude 'org.springframework.boot:xx'
        exclude 'org.springframework.boot:ddd'
        include 'org.springframework.boot:spring-boot-starter-tomcat'
    }
}
Practical demo reference of multi-module smart-doc
https://gitee.com/smart-doc-team/smart-doc-gradle-plugin-demoThere is a difference between multi-module and single-module projects. Failure to use commands to build multi-modules from the root directory may result in failure to load source code between modules and various problems in generated documents.
Create a json config
Create a json configuration file in your own project. If there are multiple modules, place it in the module that needs to generate documentation. The smart-doc-gradle-plugin plug-in will generate the interface document of the project based on this configuration. For example, create /src/main/resources/smart-doc.json in the project. The configuration content is as follows.
Minimum hive:
{
    "outPath": "D://md2" //Specify the output path of the document. Please write ./ when using a relative path. Do not write / eg:./src/main/resources/static/doc
}
Generated document
Use Gradle command
// Generate documentation into HTML
gradle smartDocRestHtml
// Generate markdown
gradle smartDocRestMarkdown
// Generate adoc
gradle smartDocRestAdoc
// Generate Postman JSON data
gradle smartDocPostman
// Generate Open API 3.0 + specification JSON documentation, since smart-doc-gradle-plugin 1.1.4
gradle smartDocOpenApi
// Generate REST API documentation and push to Torna platform, @since 2.0.9
gradle tornaRest
// Generate JMeter performance test scripts, since 3.0.0
gradle smartDocJmeter
// Generate documentation output to Word, since 3.0.0
gradle word

// Apache Dubbo RPC generation
// Generate html
gradle smartDocRpcHtml
// Generate markdown
gradle smartDocRpcMarkdown
// Generate adoc
gradle smartDocRpcAdoc
// Push RPC interfaces to torna
gradle tornaRpc


// Generate documentation for interfaces or static utility classes annotated with `@javadoc`. Supported from version 3.0.5
// Generate html
gradle javadocHtml
// Generate markdown
gradle javadocMarkdown
// Generate adoc
gradle javadocAdoc
Use IDEA
When you use Idea, you can choose what kind of documentation to generate through the Gradle Helper plugin.
Plug-in source code
https://github.com/smart-doc-group/smart-doc-gradle-plugin
The development of the official Gradle plug-in of smart-doc is in progress. The main structure of the plug-in is currently completed. During optimization testing, please wait patiently for release.
Plug-in debugging
The smart-doc-gradle-plugin plug-in relies on smart-doc to complete file parsing. smart-doc-gradle-plugin is mainly for users to make it faster and easier Integrate smart-doc into the project API document is generated in smart-doc-gradle-plugin plug-in also empowers smart-doc to automatically analyze the source code paths of some source jar. Then assign the path to smart-doc to facilitate better source code analysis.
However, smart-doc faces many users, and we cannot fully consider all kinds of codes during development. Some of the code has never even been written by the author. Therefore, when some unknown reasons occur, users usually need to debug by themselves. This section will introduce how to debug the underlying parsing of smart-doc through smart-doc-gradle-plugin in your own project.
Add smart-doc dependency
Adding the smart-doc dependency is mainly to facilitate direct viewing of source code debugging. No errors occurred, no need to debug, and no need to add smart-doc dependency to your project.
dependencies {
    testCompile 'com.github.shalousun:smart-doc:latest'
}
Find the smart-doc source code and put a breakpoint. The operation is as follows: 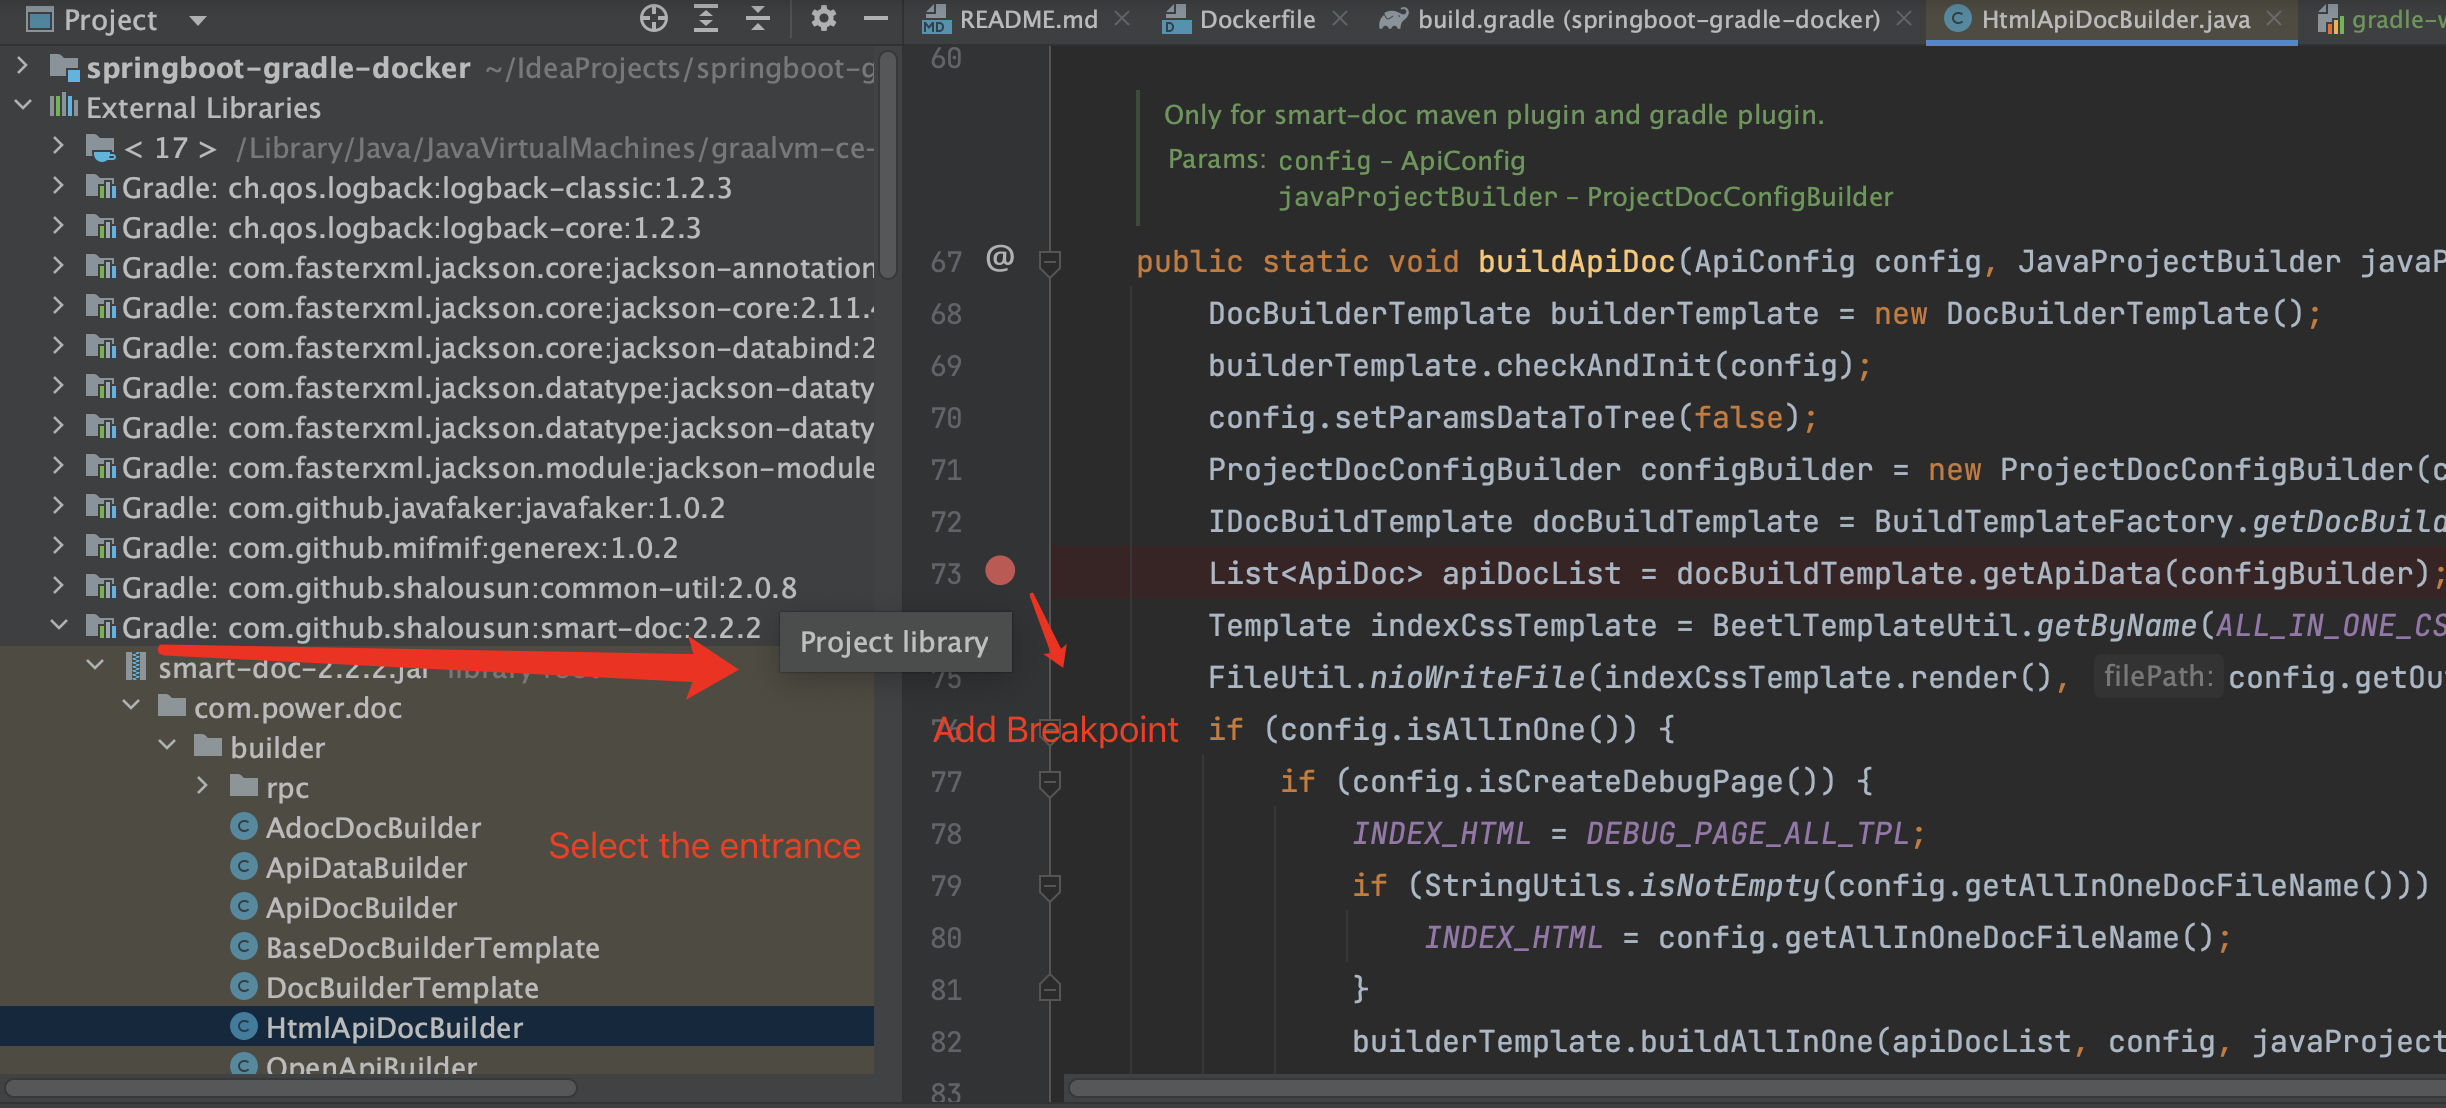
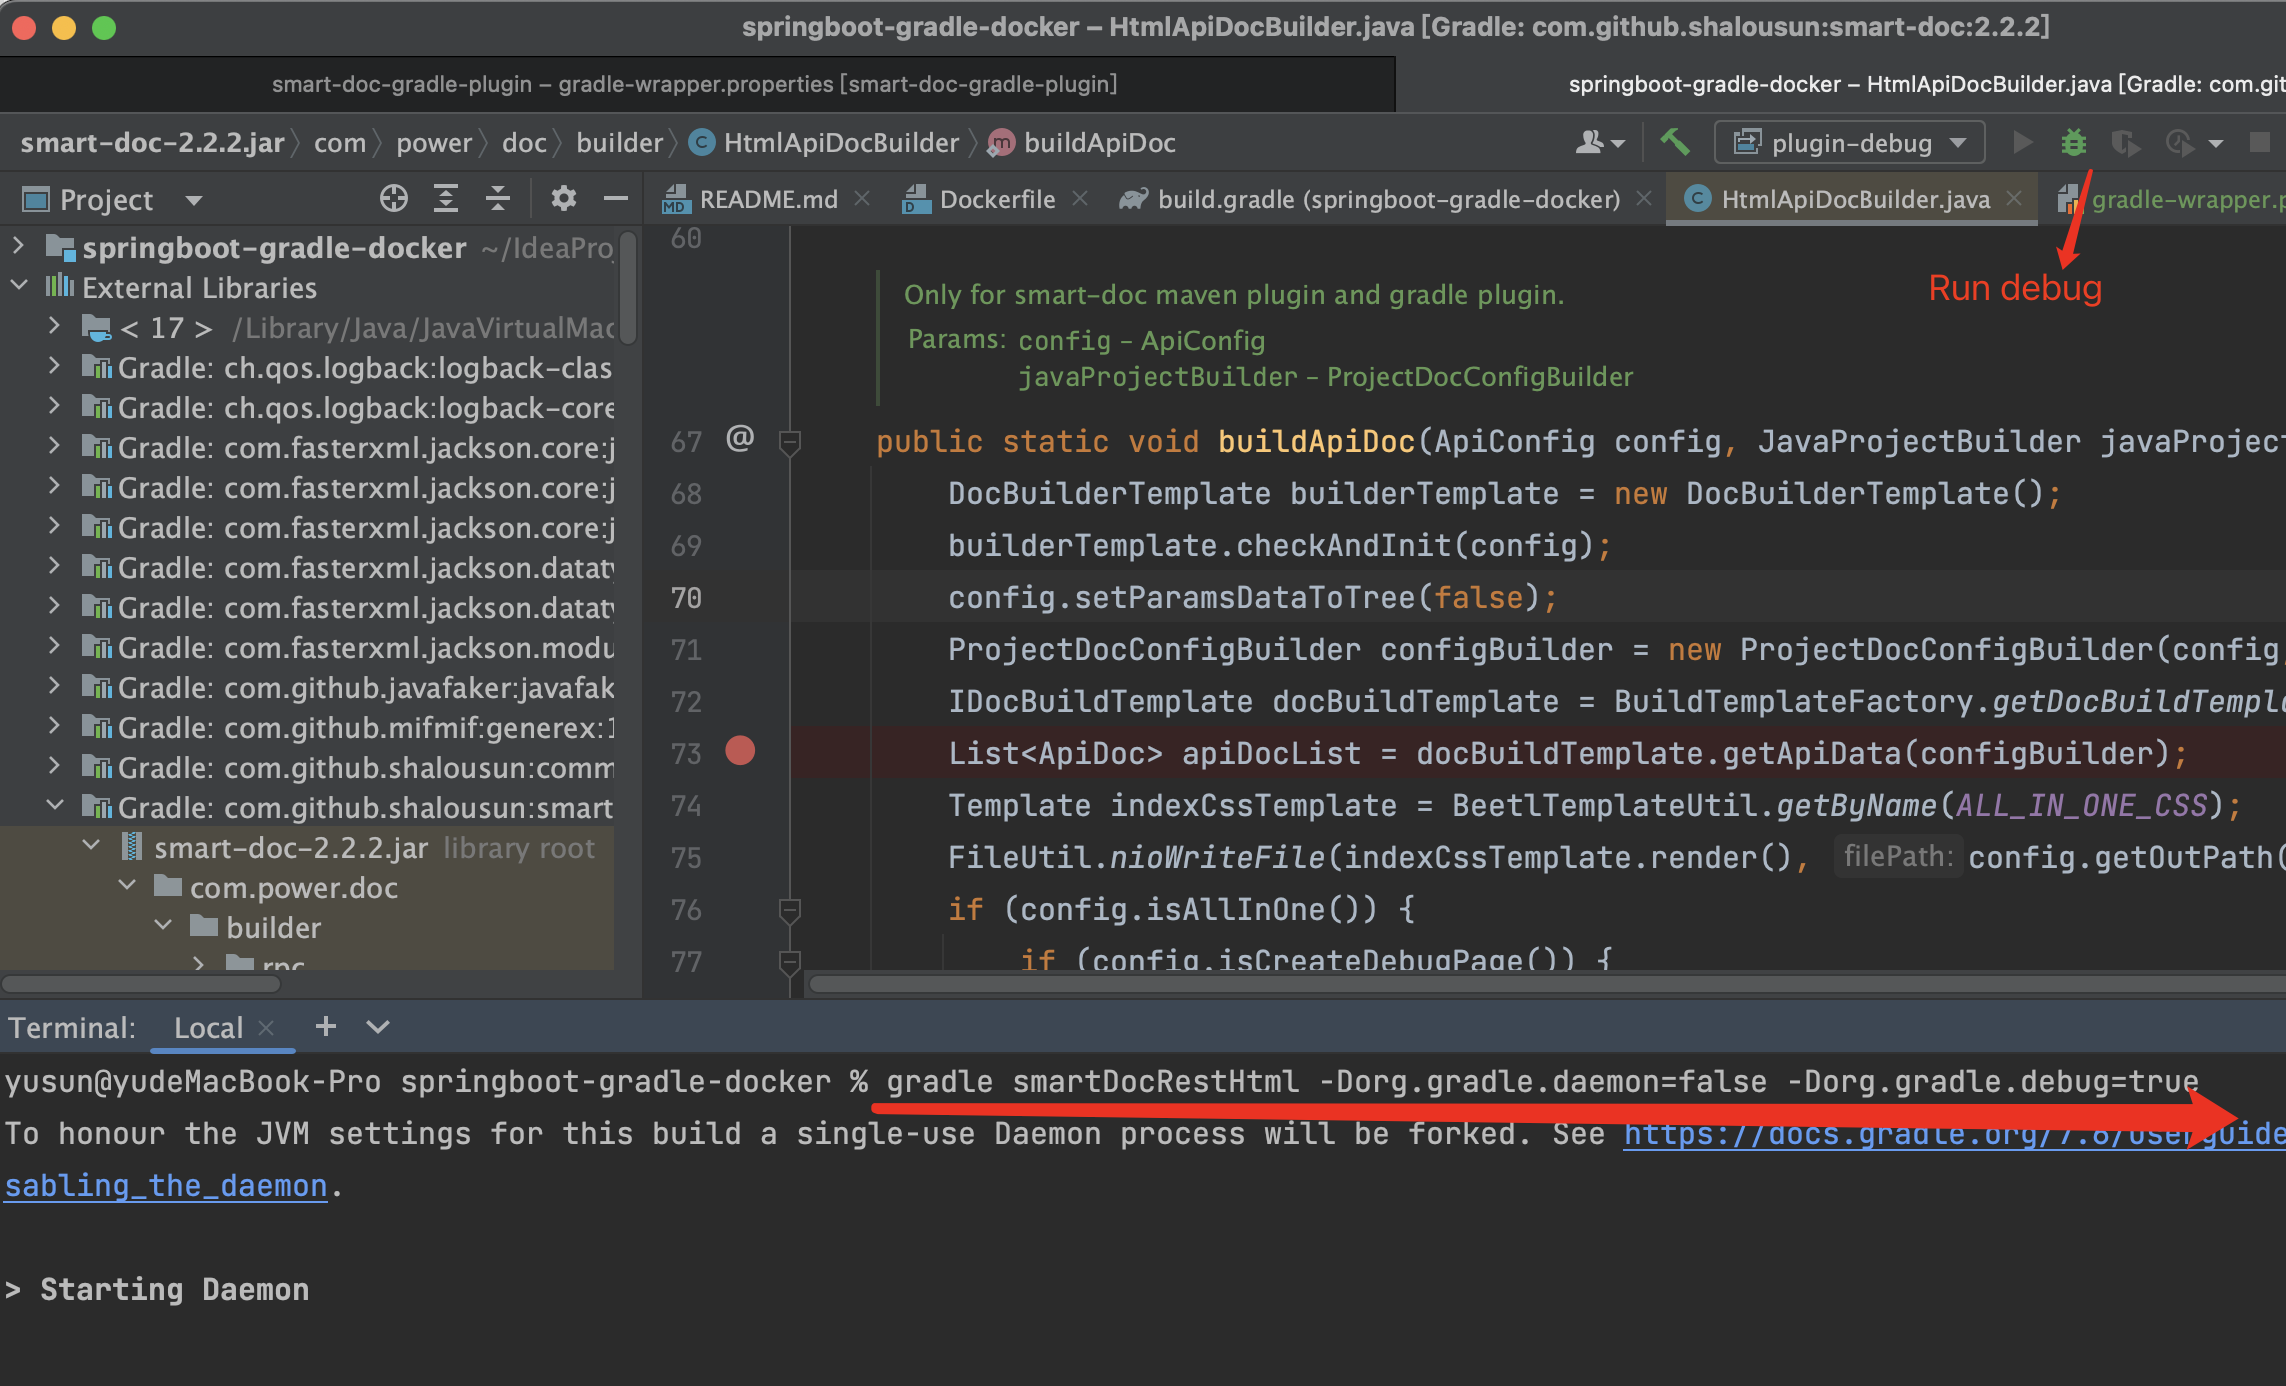
Command line terminal to set debug mode
Debugging the Gradle plugin is not as simple as debugging JAVA programs and Maven plugins. You can debug directly by clicking debug on IDEA to start related operations. It is necessary to set the debugging mode on the command line. The operation is as follows: 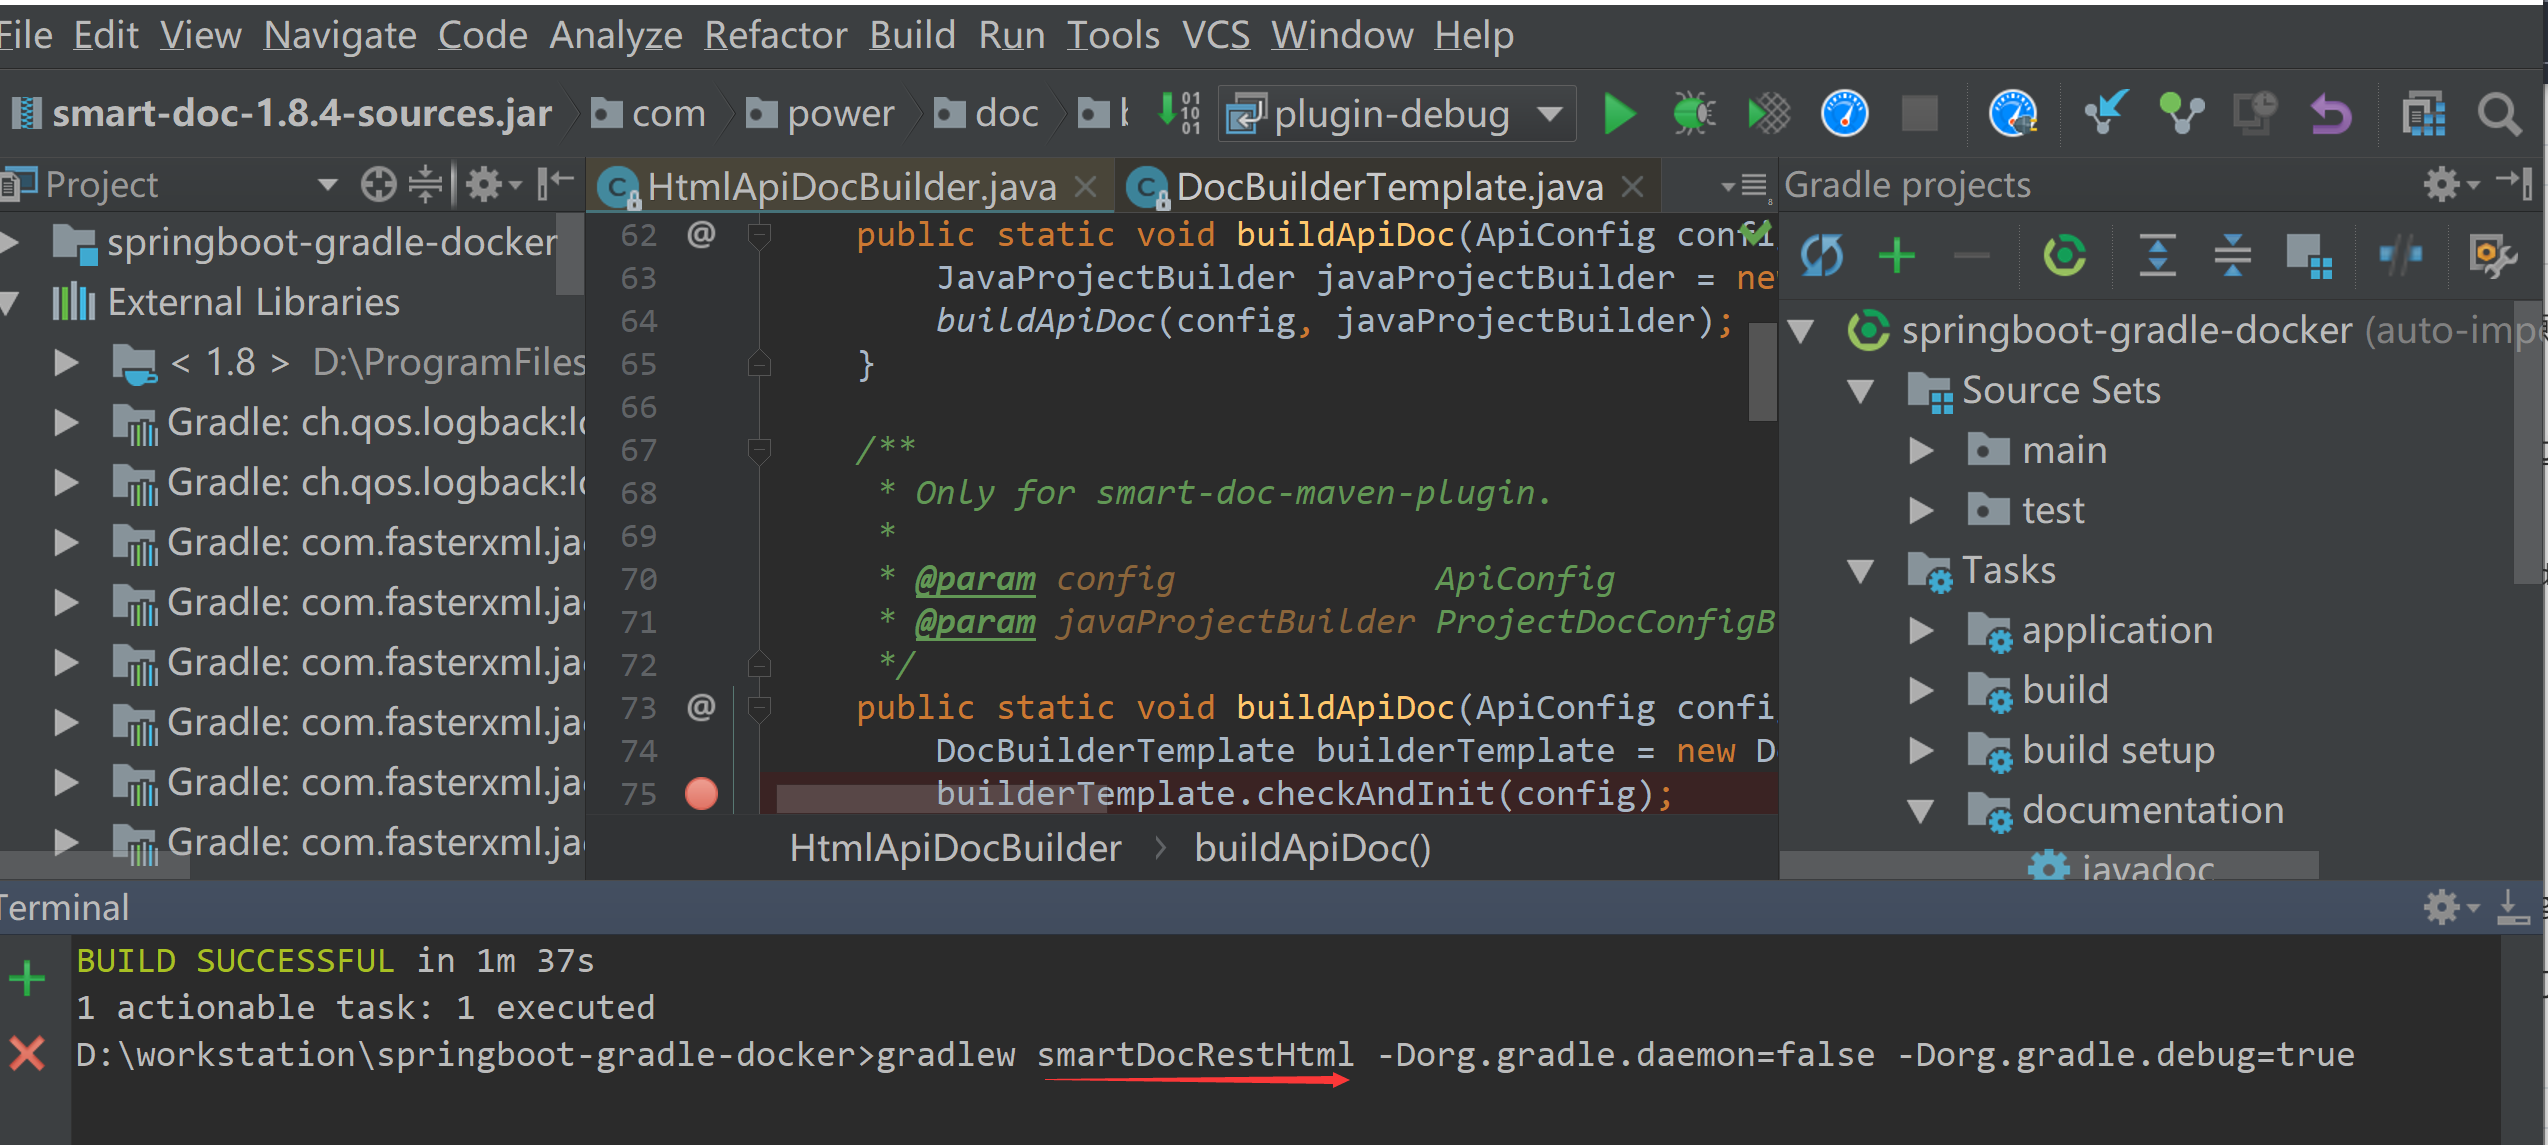 The main thing in the figure is to open the command line terminal and specify a certain
 task of smart-doc-gradle-plugin to run in debug mode. As shown in the figure above, specify the task to build the html document to enable the debug mode. The command example is as follows:
gradlew smartDocRestHtml -Dorg.gradle.daemon=false -Dorg.gradle.debug=trueIf you execute the above command, the following error occurs
Error: Main class org.gradle.wrapper.GradleWrapperMain not found or could not be loadedThen please execute the following command first to let Gradle automatically download and set up GradleWrapper. Of course, network problems will be handled by yourself.
gradle wrapperAdd a remote debugging listener
Click Edit Configurations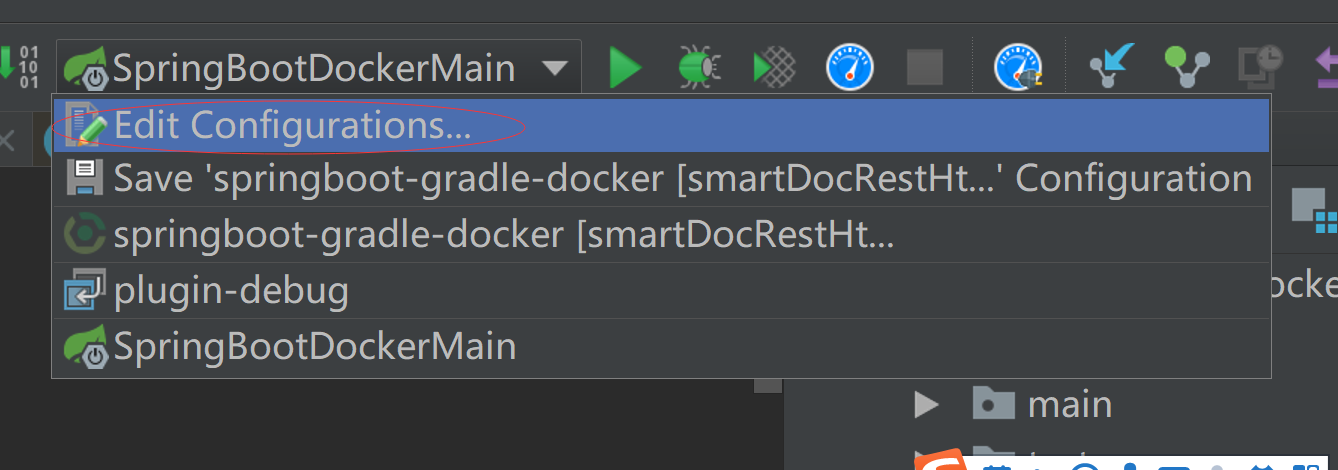 Click on the "+" sign on the left and click "Remote"
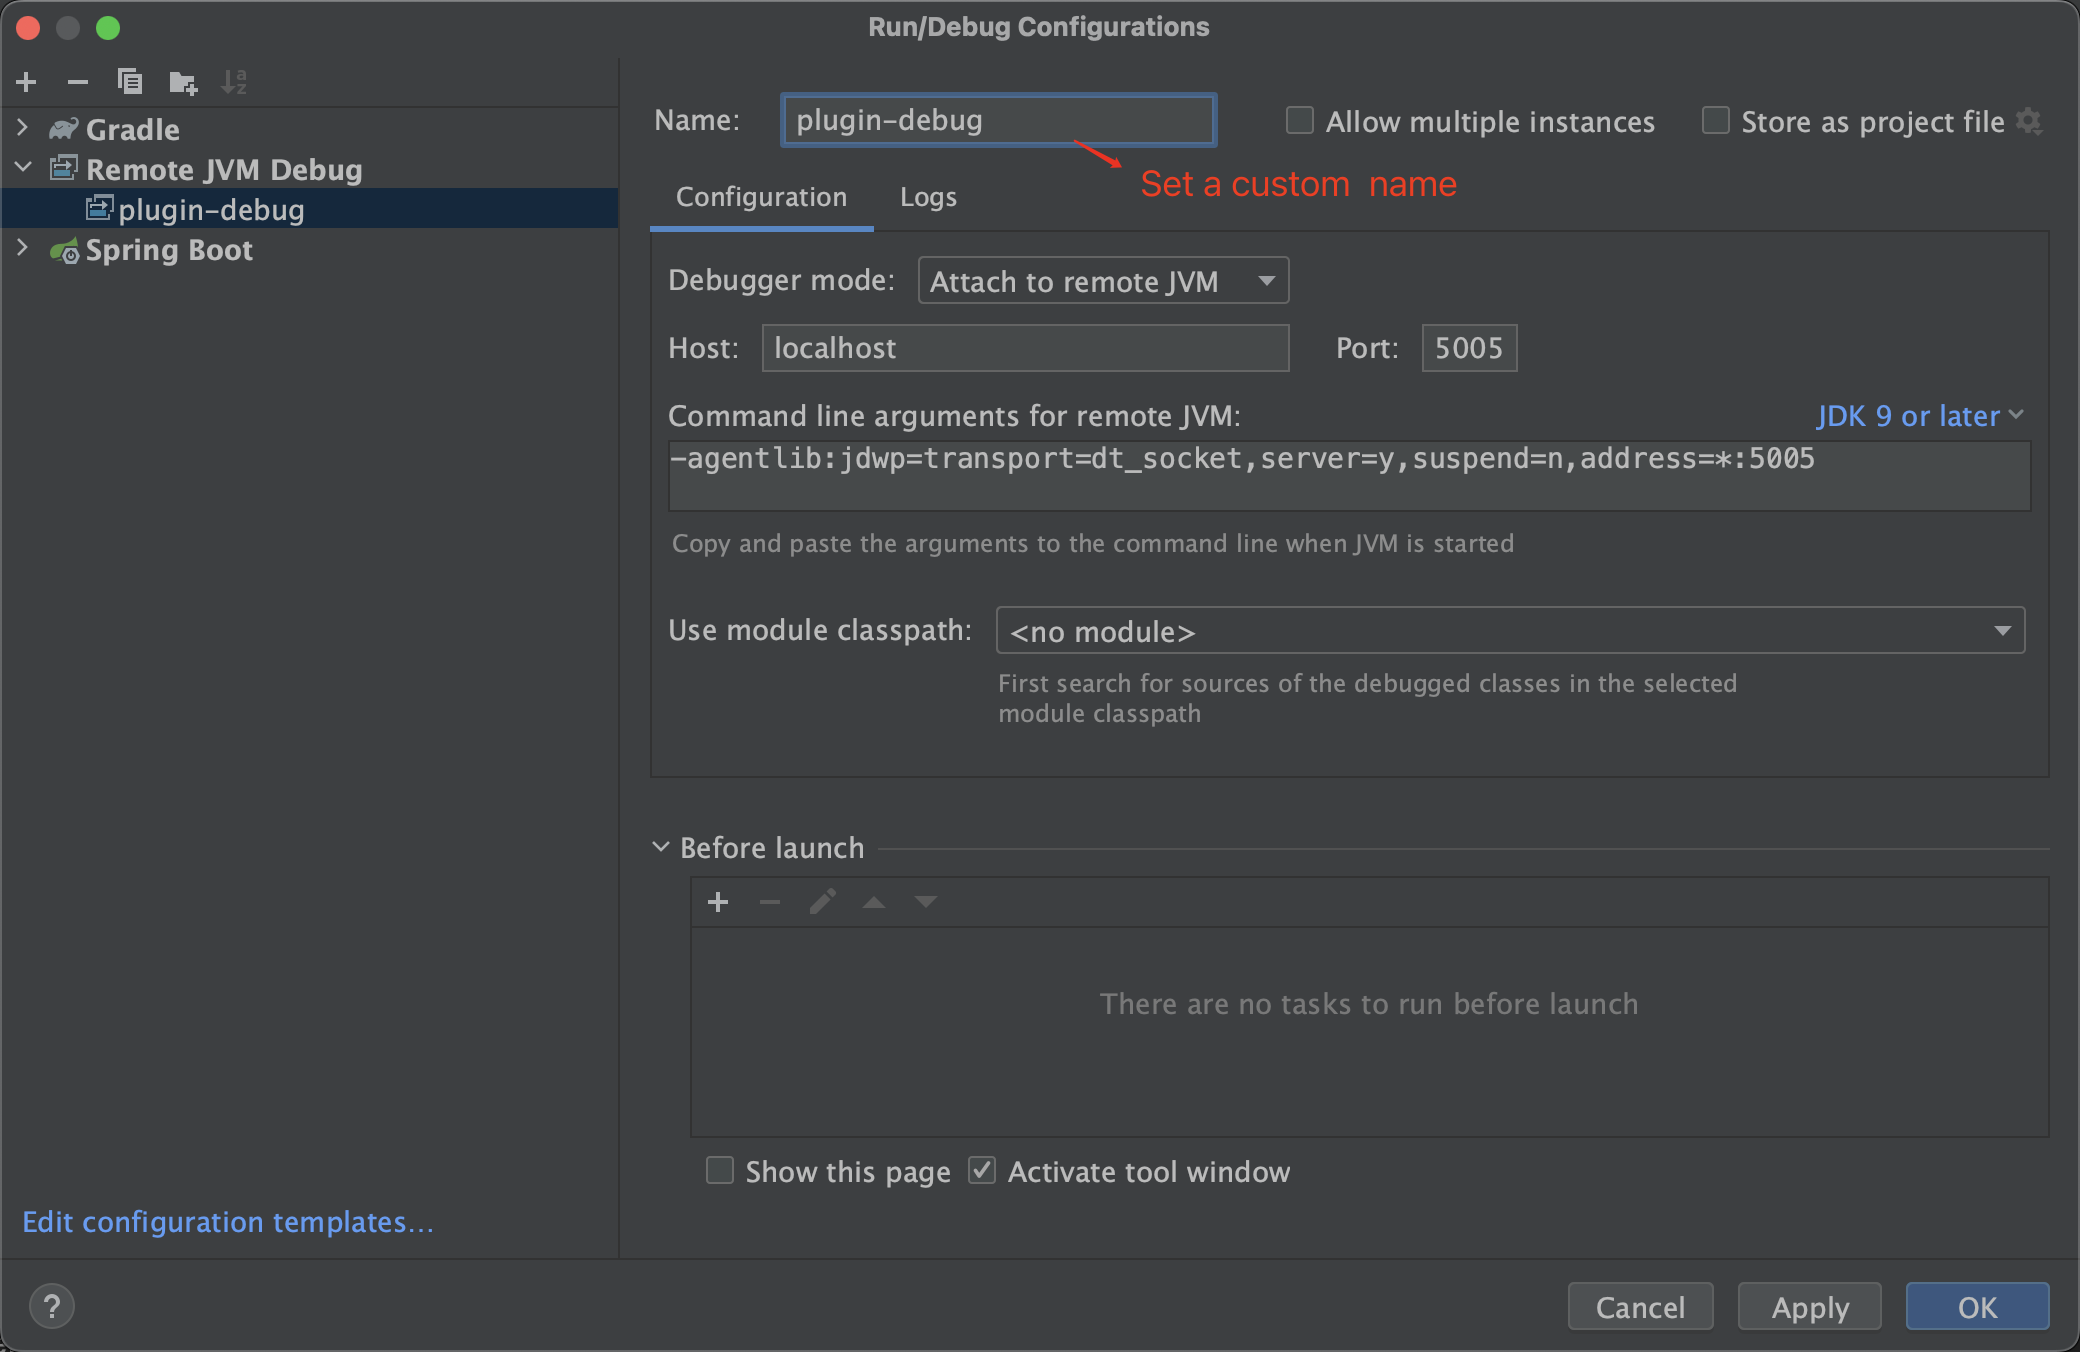
Perform debugging
After completing the above operation, you can use debug to debug the plug-in and smart-doc, and then check the execution status of smart-doc. The operation is as shown below